A na(t)ive compressor plugin
Time to dive into deep water. Let's create a native audio effect plugin. This tutorial is suitable for those who already know C++. It takes time and motivation to learn it – it's not a simple language. It's especially hard for those who previously had no programming background because its complex syntax can put off the beginner. Now, for those who do know C++, writing an audio effect for the first time can still be tricky. These are signal processors obviously, so possessing some knowledge of signals and systems could help. Fortunately, there are a plenty of good text books in the area that can guide us, like Digital Audio Signal Processing by Udo Zölzer. I used that book to understand the technical details of the compressor, the audio effect we will be creating shortly. We are planning to write a plug-in (a dynamic library) which can be used in DAWs that can host the popular plugin formats like VST, AAX, RTAS, etc. About these things: There are several of them created by different companies, being incompatible, but they are similar enough to be abstracted away. JUCE (Jules' Utility Class Extensions) does that job for us. It's a handy toolbox/framework targeting media application developers. Exactly us! It can generate a project for audio effect plugins, which then can be compiled into the most popular formats like VST, AAX, etc... (provided you have the appropriate SDK from the plugin format's manufacturer). That means that you don't have to learn the details of these different SDKs. Yeah! It has a GUI library too, an easy to use designer, OpenGL wrapper classes, thread support, and much more. This tutorial doesn't require any previous knowledge of JUCE, so you're good to go even if you've never heard of it. The features we will use are easy to learn, this is a beginner tutorial.
Getting your project ready
The easiest way to set up the project is to have to Inrojucer generate it for you.
- Acquire the latest copy of JUCE via this link.
- Go to [<JUCE's directory>]/extras/Introjuces/Builds and choose a build suiting your environment. I have Visual Studio 2013, so I'll use that. Mac and Linux builds are also available.
- Build the Introjucer with your chosen tool. (In Visual Studio 2013 – with ‘The Introjucer” selected in the Solution Explorer choose Build > Build The Introjucer from the menubar).
- Run it.
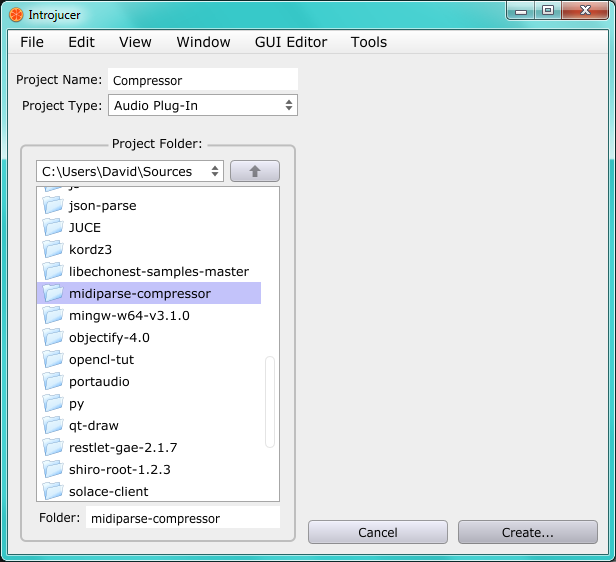
- Now, select File > New Project. This will open up a dialog box.
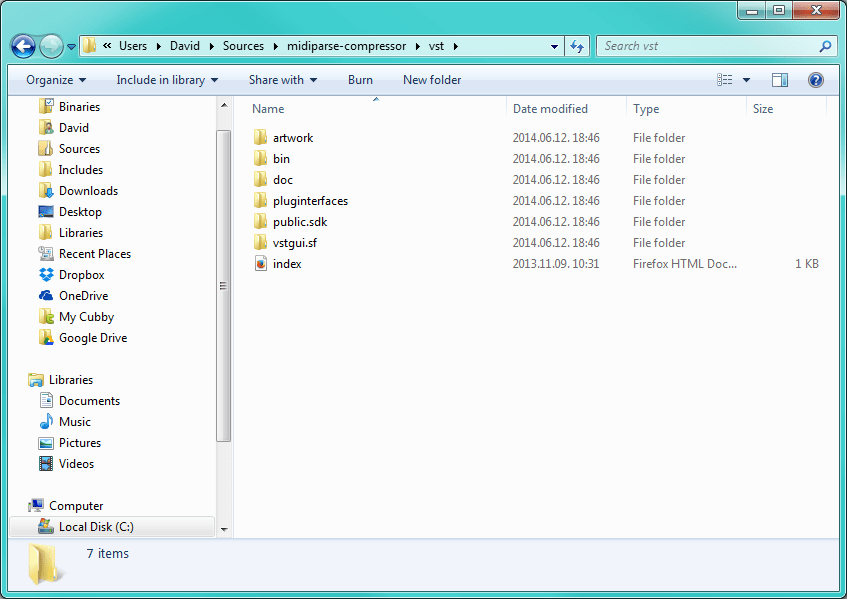
Name your project the way you like and choose an empty folder for
it. Make sure you've selected Audio Plugin as the project's
type. Click Create. Select [<JUCE's
directory>]/modules as the modules
folder.
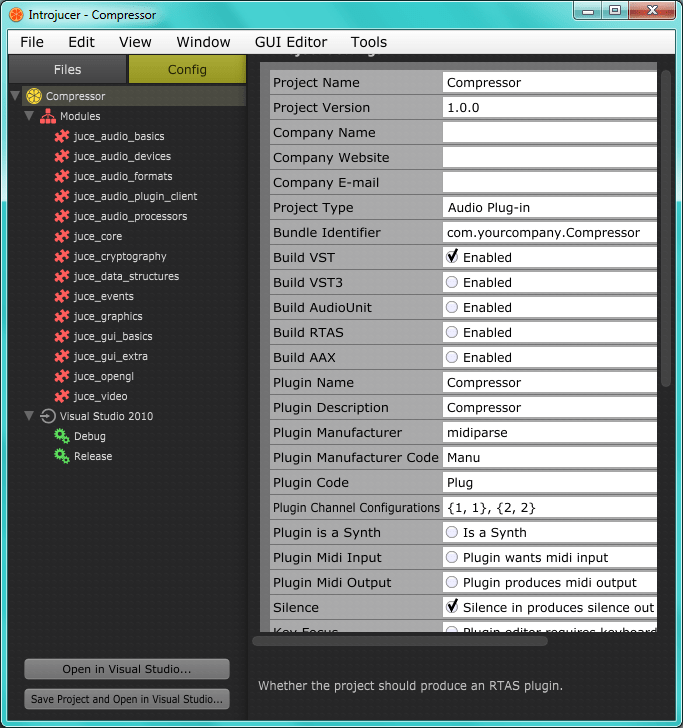
- Now that the project is created, you can configure a couple of its settings on the next screen. The most important is to choose the plugin format. You can choose multiple, but keep in mind that most likely you have to download their SDKs. I've chosen VST, whose SDK (after creating a developer account and agreeing to the terms) can be downloaded from Steinberg's network. I'll add this SDK to the project later.
- A snapshot of my settings:
 )
) - Don't forget to save the project :).
Design
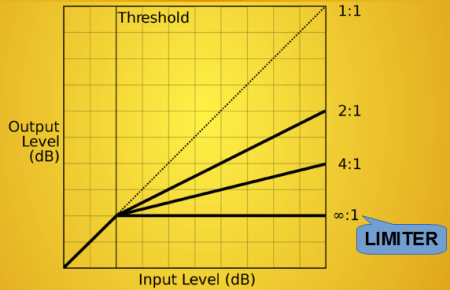
How do compressors work?
They measure the incoming signal, and apply gain correction if needed:
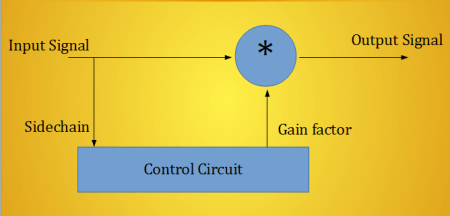
The 'when' is determined by a static
curve that has a break. Compression is done when the signal's
amplitude is above the break that is called threshold:
 ]
]
The compression rate is the input/output rate. Unity simply means no compression, whereas a value above 1 means attenuation. The control circuit is made up of 3 parts: level measurement, static curve (which was mentioned above) and smoothing.
For level measurement we will use y(k)=e\^(-2.2*Ts/Tam)*y(k-1)+(1-e\^(-2.2*Ts/Tam))*|x(k)| if |x(k)|>|y(k)| otherwise y(k) = e\^(-2.2*Ts/Trm)*y(k-1) This is called peak detection. Ts is the sampling interval, Trm and Tam are parameters. Smoothing is done by y(k)=(1-W)*y(k-1)+W*x(k), where W = A(ttack) or R(elease) depending on falling/rising edge of the input signal. Attack and Release are calculated by : A =1 - e\^(-2.2*Ts/Tas) R =1 - e\^(-2.2*Ts/Trs) where Tas and Trs are the attack and release time in seconds. If we'd like to stay minimalistic (which I approve), we should implement only the basic controllable parameters such as:
- attack (A) of the gain factor smoothing
- release (R) of the the gain factor smoothing
- threshold
- rate of compression
If you've ever used a compressor, you've surely bumped into these!
Do It!
In the source folder you'll see two source/header files corresponding to the audio processor (PluginProcessor) and it's GUI (PluginEditor). Let's edit the processor first. We extract the control parameters to the device's interface so it can be manipulated within the host. In our Processor class we create the fields for our parameters and a lock object for them. I'm not exactly sure whether the lock object is needed or not, but let's assume processing, parameter manipulating and UI thing use different threads, so use locking excessively , it won't do harm:
class CompressorAudioProcessor  : public AudioProcessor
{
/*
* Other things...
*/
private:
//==============================================================================
CriticalSection pLock;
float pAttack, pRelease, pThreshold, pRate;
};
Then we edit some of its methods: Communicate with the host that we have 4 control parameters:
int CompressorAudioProcessor::getNumParameters()
{
  return 4;
}
These parameters are normalized, so they have to be between 0 and 1. Our inner state variables have different domains of course, so we need to write converting functions between parameters and state variables.
For the state variables:
- Attack: 0.1 - 3000 ms makes sense for us on logarithmic scale
- Release: 1 - 5000 ms on logarithmic scale too
- Rate: 1 - 10 should be fine
- Threshold: -40dB - 0dB should be enough
In fact instead of rate we will use something more usable for the computation, which is called slope (or steepness?). If R is the rate and S is the slope then: S = 1 - 1/R Let's write the converting functions. Extend PluginProcessor with the following member functions:
inline float toAttack(float f, float sampleRate);
inline float toRelease(float f, float sampleRate);
inline float toThreshold(float f);
inline float toSlope(float f);
Their bodies are:
float CompressorAudioProcessor::toAttack(float f,  float sampleRate) {
  //first we create a nice curve, note that linear would be awful
  //                      |<--- this is between 0&1 --->|
  float attackTime = .1f + ((expf(f) - 1.f) / 1.718281f) * 2999.9f;
  //then convert
  return 1.f - expf(1000.f * -2.2f / attackTime / sampleRate);
}

float CompressorAudioProcessor::toRelease(float f, float sampleRate) {
  //first we create a nice curve, note that linear would be awful
  //                       |<--- this is between 0&1 --->|
  float releaseTime = 1.f + ((expf(f) - 1.f) / 1.718281f) * 4999.9f;
  //you can also use another curve if you find this too steep
  //then convert
  return 1.f - expf(1000.f * -2.2f / releaseTime / sampleRate);
}

float CompressorAudioProcessor::toThreshold(float f) {
  //f between 0 & -40 dB
  return powf(10.f, f * - 40.f / 20.f);
}
float CompressorAudioProcessor::toSlope(float f) {
  return 1 - 1.f/(1.f + f * 9.f);
}
Summarizing what we have done so far:
class CompressorAudioProcessor: public AudioProcessor
{
/*
* Other things...
*/
private:
//==============================================================================
inline float toAttack(float f, float sampleRate);
inline float toRelease(float f, float sampleRate);
inline float toThreshold(float f);
inline float toSlope(float f);

CriticalSection pLock;
float pAttack, pRelease, pThreshold, pRate;
};
Write the getter/setters. Nice thing about C++ is that resources get freed on scope exit, so the lock gets unlocked too:
float CompressorAudioProcessor::getParameter (int index)
{
    ScopedLock lock(pLock); //locks right now
    switch(index){
        case 0: return pAttack;
        case 1: return pRelease;
        case 2: return pRate;
        case 3: return pThreshold;
        default: return 0.0f;
    }
} //here it gets unlocked!
void CompressorAudioProcessor::setParameter (int index, float newValue)
{
    ScopedLock lock(pLock);
    switch (index){
        case 0:
            pAttack = newValue;
            break;
        case 1:
            pRelease = newValue;
            break;
        case 2:
            pRate = newValue;
            break;
        case 3:
            pThreshold = newValue;
            break;
   }
}
We'd like to have fancy named parameters in the host's screen so we edit this method too:
const String CompressorAudioProcessor::getParameterName (int index)
{
  switch (index){
    case 0: return String("Attack");
    case 1: return String("Release");
    case 2: return String("Comp. Rate");
    case 3: return String("Threshold");
    default: return String::empty;
  }
}
Okay, but when do we convert the parameters to state variables? The answer is: we do it during processing. If you noticed some of the converting methods need the sampling rate and dat is only guaranteed to be valid during processing. Isn't it resource hogging to convert the parameters in all the cycles? Yes it is, but I tried to keep the code simple. If you need increased performance, create fields for the state variables and a flag variable for the parameters and set it if the according parameter has changed. During processing, only refresh the state variables whose corresponding parameter have changed, then reset their flags.
Okay let's go on
We don't want to access our parameters whenever we need them during processing because the would mean locking every time. Man we hate dat. Instead the first thing in our processing method should be to create local variables from our parameters, and use them onward. So we start like this:
void CompressorAudioProcessor::processBlock (AudioSampleBuffer& buffer, MidiBuffer& midiMessages)
{
  float attack, release, threshold, slope;
  {
     ScopedLock lock(pLock); // locks right here
     attack = toAttack(pAttack, getSampleRate());
     release = toRelease(pRelease, getSampleRate());
     slope = toSlope(pRate);
     threshold = toThreshold(pThreshold);
  } //gets unlocked here! That's why I love C++ :)
}
Do the processing. ——————
We user 3 buffers for each channel. They are the input level (lvl), control level (env) and output level (out) buffers. Our filter is first order, all these buffers retain values from the last cycle only. They are arrays because of our multiple channels:
class CompressorAudioProcessor: public AudioProcessor
{
/*
* Other things...
*/
private:
//==============================================================================
inline float toAttack(float f, float sampleRate);
inline float toRelease(float f, float sampleRate);
inline float toThreshold(float f);
inline float toSlope(float f);

CriticalSection pLock;
float pAttack, pRelease, pThreshold, pRate;
float *lvl, *env, *out;
};
These buffers have to be initialized in the prepareToPlay member function:
void CompressorAudioProcessor::prepareToPlay (double sampleRate, int samplesPerBlock)
{
  int numChannels = getNumInputChannels();
  if (env == 0) env = new float[numChannels];
  if (lvl == 0) lvl = new float[numChannels];
  if (out == 0) out = new float[numChannels];
  memset(lvl, 0, sizeof(float)* numChannels);
  for (int i = 0; i < numChannels; ++i)
     env[i] = out[i] = 1;
}
And torn down in the releaseResources method:
void CompressorAudioProcessor::releaseResources()
{
  delete[] env; env = 0;
  delete[] lvl; lvl = 0;
  delete[] out; out = 0;
}
Also remember we have to write the constructor:
CompressorAudioProcessor::CompressorAudioProcessor():
pLock(),
pAttack(),
pRelease(),
pThreshold(),
pRate(),
lvl(),
env(),
out()
{}
This may seem like code bloat at first sight, but remember that at least our pointers have to be initialised to nullptrs, else the memory allocation won't take place in prepareToPlay! Include <algorithm> and <math> if not already in and write this monster finally:
void CompressorAudioProcessor::processBlock (AudioSampleBuffer& buffer, MidiBuffer& midiMessages)
{
  double sr = getSampleRate();
  float attack, release, slope, threshold;
  {
     ScopedLock lock(pLock); // locks right here
     attack = toAttack(pAttack, sr);
     release = toRelease(pRelease, sr);
     slope = toSlope(pRate);
     threshold = toThreshold(pThreshold);
  } //gets unlocked here! That's why I love C++ :)
  float matt = 1.f - expf(1000.f * -2.2f / 5.f / sr); //Tam
  float mrel = 1.f - expf(1000.f * -2.2f / 130.f / sr); //Trm
  for (int sample = 0; sample < buffer.getNumSamples(); sample++){
     for (int ch = 0; ch < buffer.getNumChannels(); ++ch){
        float in = fabs(buffer.getSampleData(ch)[sample]);
        lvl[ch] = in > lvl[ch] ? (1.0f - matt) * lvl[ch] + matt * in : (1.0f - mrel) * lvl[ch]; //this is the level measurement part
     }
     float max = 0;
     for (int i = 0; i < getNumInputChannels(); ++i) max = std::max(max, lvl[i]); // stereo processing. choose the channel with loudest signal
     float control = max > threshold ? powf(10, -slope * (log10f(max) - log10f(threshold))) : 1.0f; //compressing above threshold
     for (int ch = 0; ch < buffer.getNumChannels(); ++ch){
        float* ins = buffer.getSampleData(ch);
        float* outs = buffer.getSampleData(ch);
        float k;
        float c = env[ch] - control;
        //smoothing with small histeresis
        if (c > 0.04) {
           k = attack;
        }
        else {
           if (c < -0.04)
              k = release;
           else
              k = (release + attack) *0.5f;
        }
        out[ch] = (1.0f - k) * out[ch] + k * control;
        env[ch] = control;
        outs[sample] = out[ch] * ins[sample]; //output
    }
  }
}
The first part is setting up our stat variables, the second is our first block, the level measurement. Notice that we don't use dedicated envelopes for each channel, that would distort the stereo image. Instead we determine the signal that needs maximum compression and apply that to all of our channels. The next part is the actual static curve. Finally we have the gain factor smoothing part (the third block).
Build
One more thing before the project is ready to be built. Remember when we chose the audio plugin format? We have to include it's SDK into the project. I'm using vst 2.4, and that means i had to include it's headers. This is my Visual Studio setup:
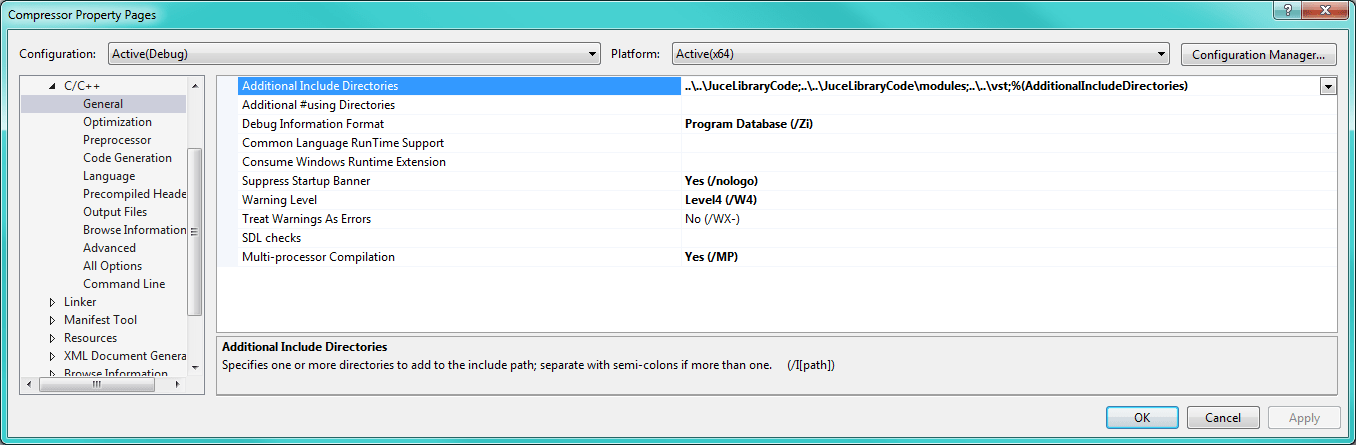
Notice the vst folder added to the additional include directories in my project. This folder contains the public.sdk and pluginterfaces folders which are used by the project. Okay let's build an try!!!
Summary
What we have is a very primitive compressor. As you can see this tutorial is only dealt with the very basics. What is left to be done:
- Writing a GUI
- Adding more parameters
- Adding meaningful display values for the parameters on the host's screen
I will upload the source code of this project to my Github later. Stay tuned! Until then check out and star my GitHub! I also have a more complicated compressor/expander/limiter/noise gate with GUI and everything! https://github.com/dszakallas I hope that I didn't mess up anything! If you find any errors please tell me!
Cheers, midiparse